At one point I was trying to figure out a good way to do a quick, smooth and hassle free demo of a mobile app feature. The simple way is to share the screen and show the feature from a simulator, but it lacks the context of the person and the person’s hands actually using the device and app and if the feature has a hardware or a physical context, that is lost too.
In this post I’ll go through how to setup OBS with multiple scenes, capturing the screen of the mobile device & the users hands and how to share it to MS Teams.
What you’ll need:
- OBS Studio
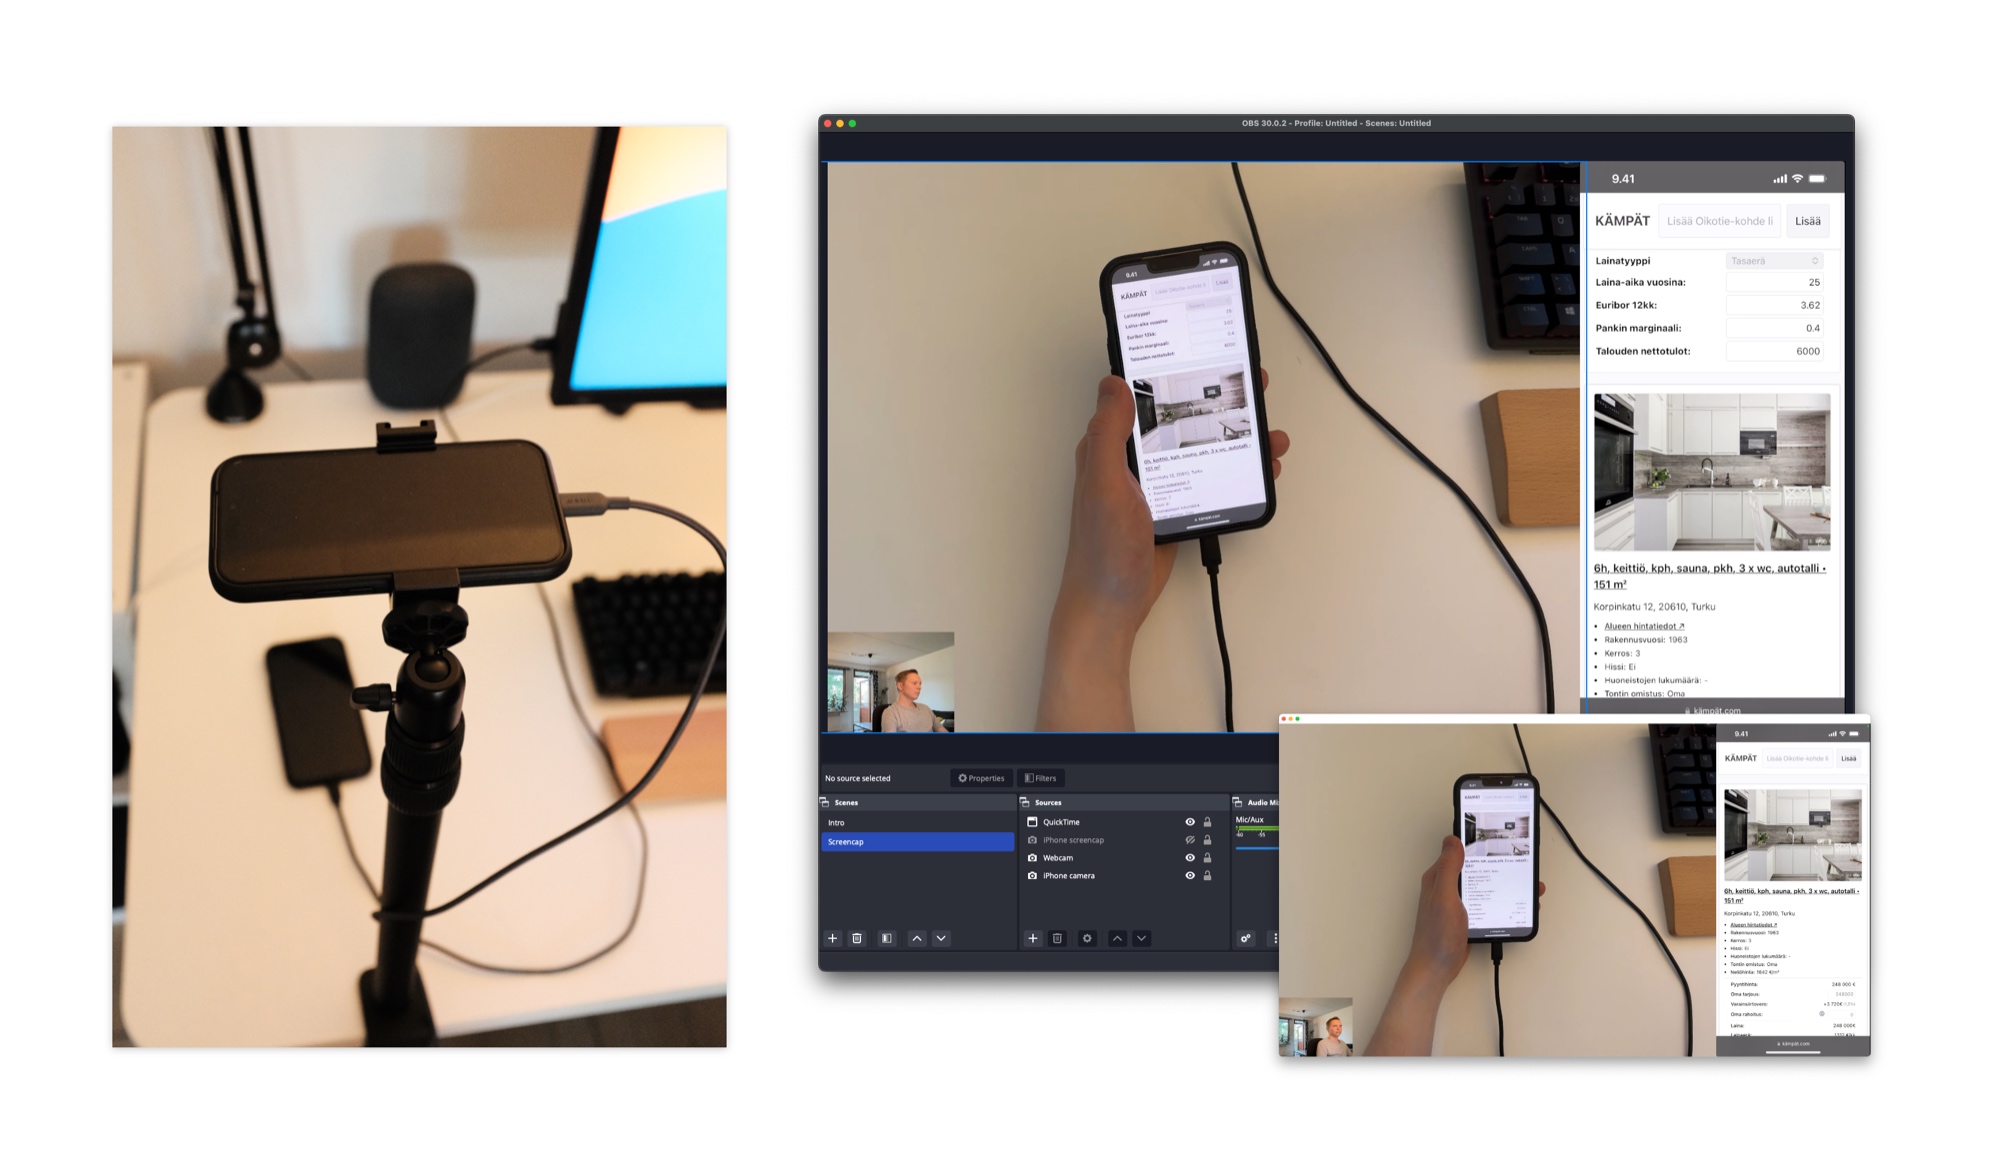
- Real device (I used iOS) & cable
- 1 external camera (+1 built-in laptop webcam if you want to show your face). Could be a webcam, another phone or a camera with a USB capture card
- Some sort of camera stand: tripod or a desk mount. Few options: Ulanzi LS01, Ulanzi LS08 + Ulanzi ST-02S phone holder
- Optional: Scrpy to capture Android device screen
- Optional: DeskPad: virtual display for macOS
Software
OBS has multiple scenes that can have different content and can be easily & smoothly switched between each other. I had one scene with browser window, one with the schema sample image and one with multiple cameras & mobile device capture to show the screen and me using the device clearly. Some scenes for example:
- Browser to show Miro/Figma
- Presentation slides
- Sample images of schemas etc.
- Main demo
- Backup video in case live demo fails
Adding inputs to scenes
- Adding windows: Sources -> macOS screen capture -> Window capture & select window.
- Adding device capture: Sources -> Video capture device & select wanted camera(s)
- Adding real iOS device: The video capture can be added directly to OBS, but it didn’t have good or correct colors. QuickTime can capture the device screen with correct colors (open via File -> New movie recording & select the iPhone screen) and this QuickTime window can then be captured to OBS via window capture.
You can move and resize the inputs in the preview panel to have cameras & captures aligned and overlaid nicely. To share the output to Teams, I opened the windowed preview screen (right click on preview & select “Windowed project (Preview)”) and shared that window to Teams. OBS has virtual camera output, but I couldn’t figure out a way to make it highlight & present to everyone during a meeting. You can then click & change the scenes during the presentation to change what you’re showing.
Sharing to MS Teams
Using DeskPad:
- Download, install and launch DeskPad
- This will open a virtual screen
- Open fullscreen preview of OBS on the DeskPad screen by right clicking preview, selecting full-screen projector (Preview) and Deskpad display
- Share DeskPad screen to Teams
Using OBS windowed preview:
- Open windowed preview of OBS by right clicking preview and selecting Windowed Projector (Preview)
- Share that window to Teams
Using OBS virtual camera:
- Instead of sharing windows or screens to Teams, you can use the OBS output as a fake webcam that can be used in Teams
- Select Start Virtual Camera in OBS
- Configure your webcam to be that virtual camera in Teams
- Spotlight your video in the meeting, so that it’s shown as a large view to everyone
Other links: